Showing posts with label DFSA Year 2. Show all posts

Thursday, 4 May 2017

so many hours spent, gone, and we are not done with it. THE CURSE OF THE ANIMATION

There is a saying: you always need more for animation.

You feel like there's always something to improve and it's true.

Raw hand drawing

Primary colouring

Overlay coating 
After doing composition/ transitions in AfterEffects, we went back to Photoshop for colouring. I coloured over 10 drawings with brush tool. Then with an overlay, created the hand-coloured style. I am really happy with the result. The whole colouring process is roughly one hour per drawing.

We call it sweat shop

We came back to work on stuff together at the end the production. We need to consider everything together. At the same time, same room, we fine tune the character, the compositions and the music.

Ableton Live 
Minimalistic is what we want and we used only the piano. It took two days together with editing to complete the soundtrack.


I am happy for where the project stands right now but I can see there's a lot to improve for a festival competition level. We will put it on pause right now for a break and come back in a few weeks and see how we feel about it.

Monday, 10 April 2017

Making the Compositions

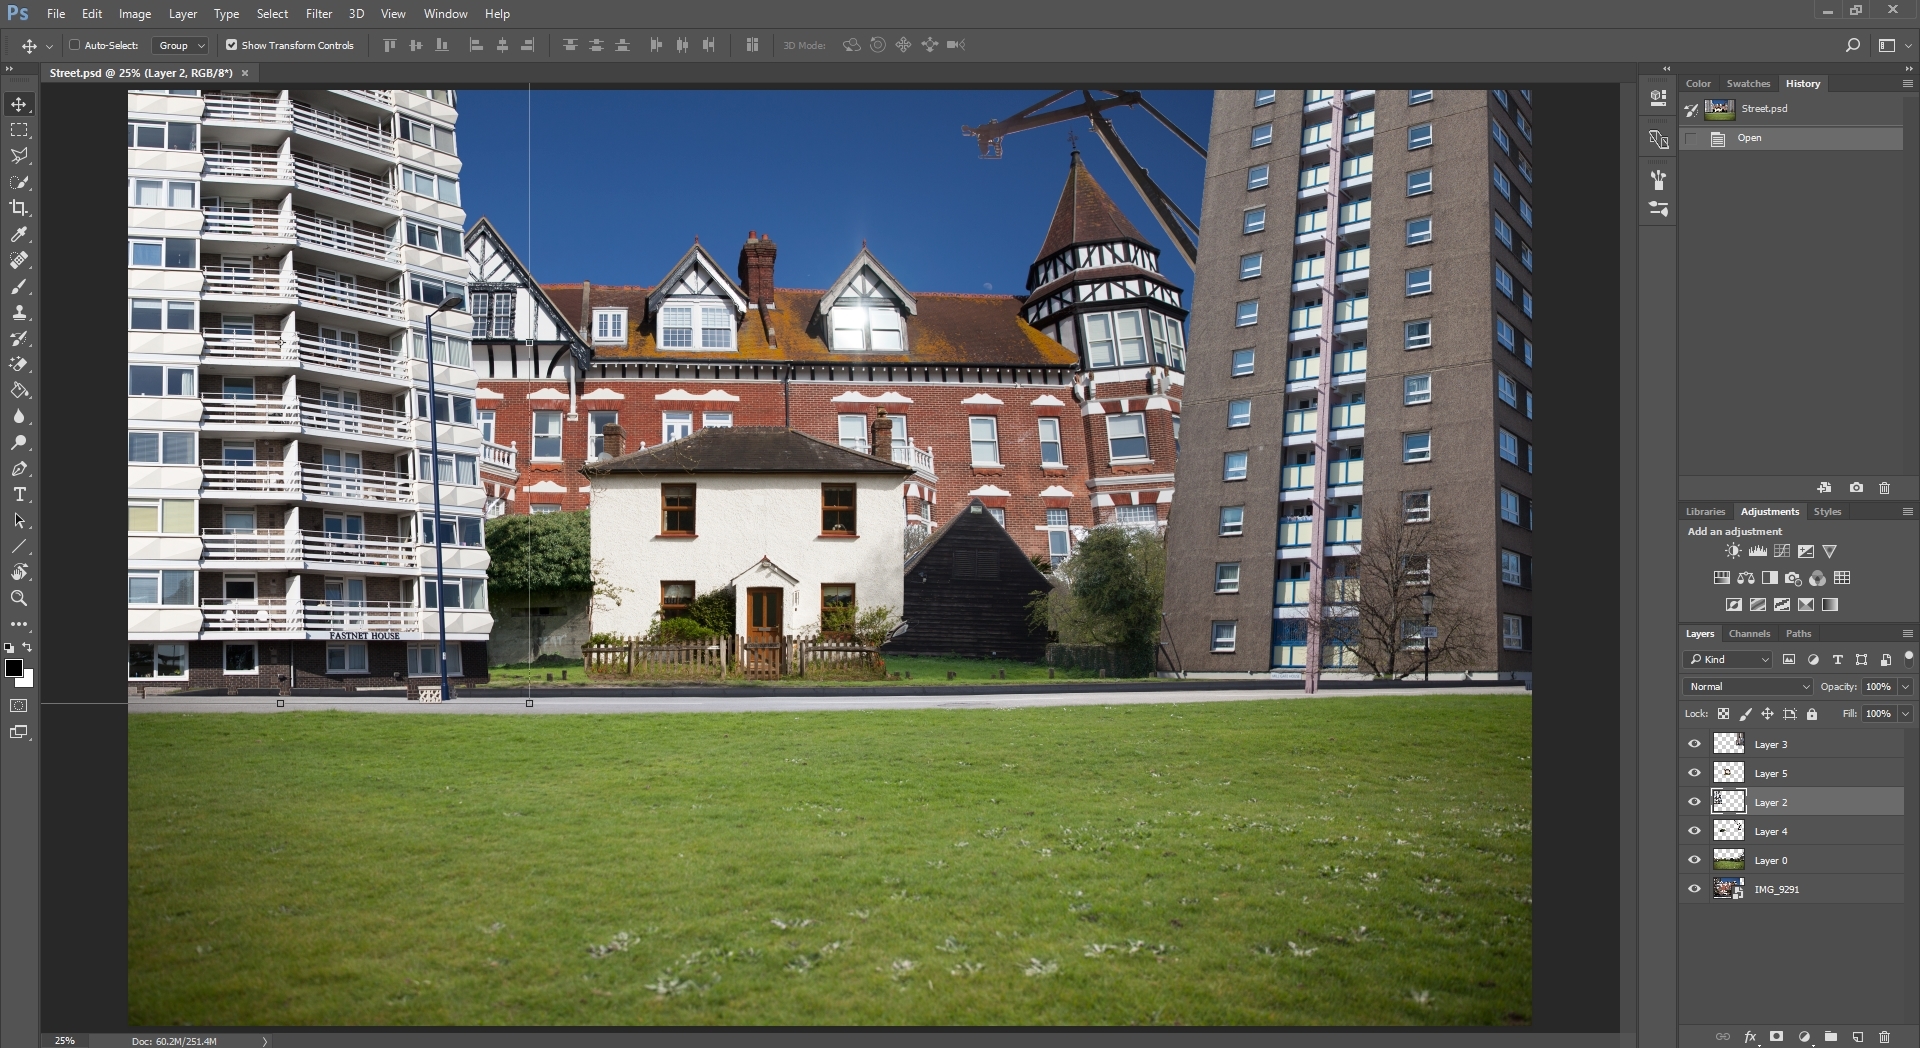
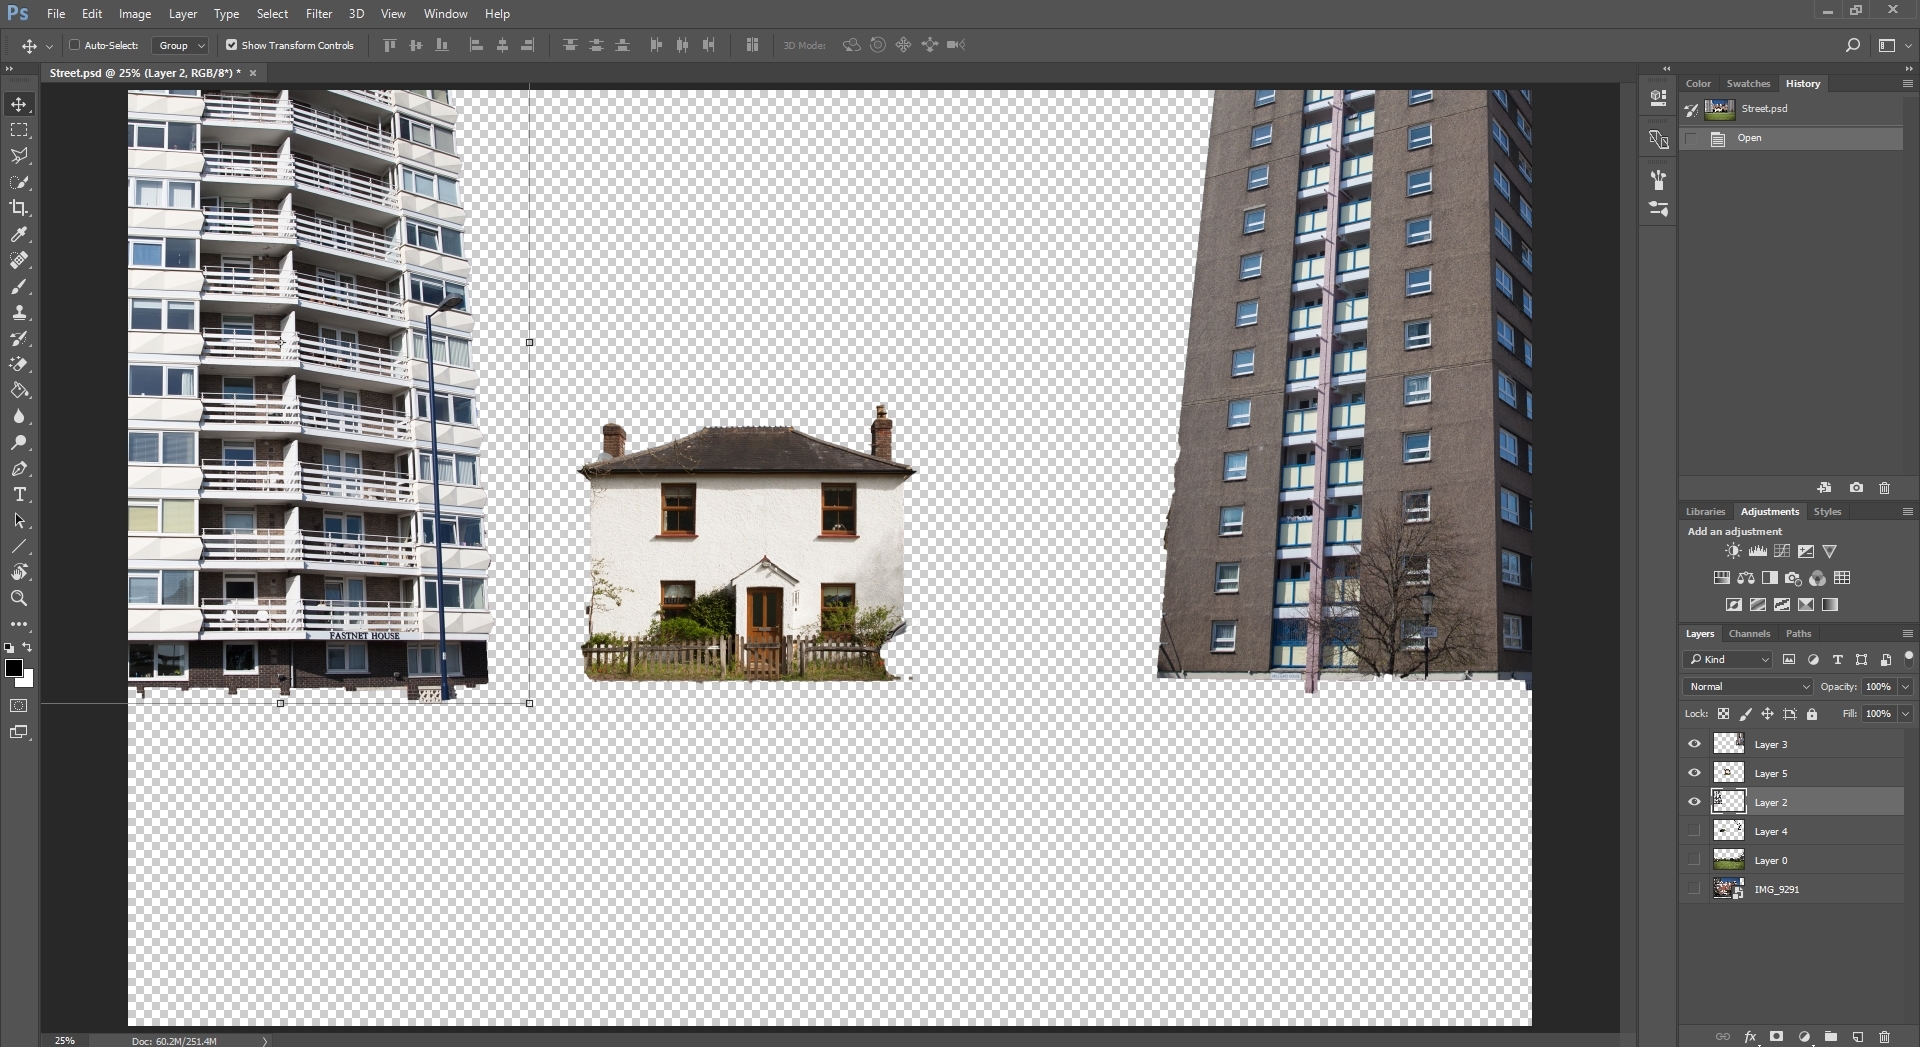
One of the composition in Photoshop 

Rough sketch 


After doing the storyboard, we went out for a few photo days to take all the photos we need to do the compositions. Two of the days for locations stuff like buildings and street. One of the days for objects like teddy bear, dog bed, toy cars... We had on our hands a list of photos to take and planned our photo days through.


Four of us, one tripod and camera
We chose the buildings we like and planned on the angles to take the photos. The tutorial with Peter was comforting as he encouraged us to experiment with the photos but at the same time be mindful of the positioning of the camera. 

We were drenched in rain and shoes covered with mud

It felt like the last project in 1st year again. We were pretty much exploring everywhere to look for elements that we might include in each compositions. 

Someone wants to be in our project...
As for the objects, we were taking photos in Jay's house. The objects were laying on with papers for better results in cutting them out in photoshop. 

He just sat on one of the paper when we were didn't pay attention to it. He stayed for a long time as well. Just like he knew what we are doing and he's ready to be part of it. haha
The white sheets helped a lot. In photoshop, the very first thing we do is to cut out the elements one by one. The last thing to do in photoshop was to put all the elements together, mix and match, stop when I am happy with the composition. Cutting out the objects was way easier because of the sheets. We just need to use quick selection tool. For the buildings and other stuff in the environment, we had to cut them out manually, pixel by pixel. It took a long time in preparing the elements than putting them together. 

the process
When it's done in Photoshop, we brought it to AfterEffects. The full layout will be shown in AfterEffects with layers. From then on we can animate the movements. 


Saturday, 8 April 2017

VFX Title Squence Development

Cornwall March, 2017. It is just so pretty, everywhere.

After the lesson, I decided to use the 3D space to navigate around the elements.

The order of the title sequence will be:

(Name of the Studio)
(Name of Production Company)
A Film by (Director's name)
Staring (Name)
Owl Man
Featuring (Names...)
Casting by (Name)
Music (name)
Production Designer (name)
VFX Maisie Mok
Edited by (name)
DOP (name)
Producer (name)
Base on the Owl Man mystery in Cornwall


The outline:

-moving forward on pavement in the woods
(Big name)-  Chio Studio
                  -  Legend Production

-sign post flips
   from A Film by
   to      Ruth Westwood

-still moving forward sees the church and graveyard
  zoom in on the graveyards and see
Staring 
Tony Haway 
  
-Owl Man fly over the screen revealing the film title Owl Man


However, there's not enough time for me to do all of that.

So the real outline is the following...

into the woods then reveal - (Name of the Studio) 
pan to reveal - (Name of Production Company)
Sign post - A Film by (Director's name)
Video - Staring (Names)
owl man sketch revealing - Owl Man

I would love to have the credits on sign posts
The project is mainly for me to explore in the world of VFX despite not knowing to well of it. The reason why I chose Owl Man as the theme and "imaginary movie" is because of my work experience in a similar project that is on going. I can't give out too much detail but I just want to have fun with the myth. I actually went to Cornwall as well for a UCAS event but I missed the bus to the church where the sightings based. I didn't get to go and see if the Owl Man is still there haha.

It was quite difficult to do the project due to my skill but I am happy I finished it at the end. Looking back, I don't think the colour purple was a good choice... I should've at least chosen a different shade of purple, a darker purple. It is too bright.

Drawings by the teens who claimed to saw the Owl Man, top one is used in the project

Art work found on google that I was planning to use
The video at the end was taken from Getty image by searching Cornwall. I cropped out the logo and added a cartoon effect on it. It's in black and white just like how we perceive the history. 

Last, owl man sketch revealing the Owl Man title haha! 

Saturday, 1 April 2017

Filming Dance Film

It was a surprise to have received Sugini's invitation to film their dance film but I am very happy to help with that. I like their concept and their dancer Grace seems really cool when we met in the pre-light.

In the pre-light I told them how to set up the GH4 and told Sugini more details about using it according to my experience with it in my Maps & Networks.

In the filming days it was quite straight forward, doing what camera operators do and listen to Sugini. I really enjoyed the lighting and the dance. Everything looked nice in the camera. Ethan and I worked closely together. We agreed that I will be working on all the still shots and Ethan on the moving shots. I am not a fan of managing the heavy shoulder rigs.

I loved the jib. This is one of the test. 
The red outline of Grace showed us she's in focus. We asked Grace to stand in frame so that we can focus on her final position.

We spent quite some time in setting up the equipments, especially the jib. It was all worth it.


Friday, 17 March 2017

Mental Meltdown

The meeting with the dancer came to a conclusion that we are not going to do the dance film...

We were very happy that we have someone to meet up with very early on in the pre-production process. We also had our green screen room and equipment (EX3) booked for a week to do the shoot. What's left is the dance studio room too book but that requires confirmation of the dancer.

I felt a bit sad not doing the dance film but I also believe it is better for our showreel. It is the fact that we all wants to spend more time in post production, building our fantasy world. The dancer was really nice though. We will send her an apology.

Thursday, 16 March 2017

VFX Project Lesson Practise


First, we familiar ourselves with the 3D space and camera in After Effects(AE) by making a 2D picture of a room into 3D.

We need to use Photoshop to create these panels before importing them into AE.

The vanishing point tool is quite difficult to control.


Then we created some shape layers in a 3D environment and try to get the camera to navigate around them. It was so fun and I learnt a lot more about the 3D space.


Last we used lots of pictures and composite them into a fantasy environment. It gave me lots of ideas in this unit and also the Fields an Frame unit.

VFX Project Inspiration


I started with looking at good title sequence and observe the flow of them. Like what comes first and how to end it. Most importantly seeing different types of title sequences.

 
Then I found this amazing Grad piece.

Sign
Lynda course that I am learning from: After Effects CC 2017 Essential Training: Motion Graphics


The idea is from a Owl Man story in Cornwall.


This is me explaining what I did for the first test title sequence. What I didn't mention is that Fractal Noise effect that I add to the AE project is almost overheating my laptop lol. I wanted it for a fog effect to add to the spookiness. But since I also allow it to generate constant displacement in the background, the AE is constantly rendering the effect and re-render is needed whenever I change anything in the project. I might consider putting that last.

As for the theme, I want it to be spooky. So purple would be the theme colour and I will think about other colours to fit to it.

Saturday, 4 March 2017

Dance Film Presentation and Updates


Click here to see our PowerPoint presentation

Due to working on grad film for the week, Ethan and I wasn't available to present with the group. Luckily, our group works together very well and work very closely together on everything that the other crew member can speak for us. I am really sorry for not having a chance to listen to everyone's idea at the moment.

Just got updated from the presentation today, just a few changes on the plannings. The feedback was that we need more time for VFX to be done.

At the same time, we got a reply from a dancer telling us the available times. So we made some changes to the plan/ deadline that we made:

10th March - get dancer

3rd March - equipment and studio booked

15th March - get the dance moves done, equipment and studios booked

30th March - finish filming

7th April - sound design done (before Easter break)

14th April - editing done

1st May - VFX done

4th May - Assessment


We are having the green screen studio on 6th with the dancer to see if we can work well together. 

I believe we do! 

Wednesday, 22 February 2017

Location Scouting

We started with a list of places that we want to explore.... 
Graveyard
bench
cinema

Beach
lake district
coffee shop

freshem pond sands
tower block
cranes
suburban street
windmill
school
kids play park
rugby pitch
light house
pier
viaduct

ports down hill, porstmouth
barbacan estate
bournmouth beach
portsmouth dork
terllick tower


am -
freshem pond sands
Surrey hills

pm -
Portsmouth 
Southampton 

Someone brought this up:


It is just like what we want! Except we are doing dance.

Then we went on location scouting around Farnham and Southampton. Taking photos/ videos, thinking about each possibilities that we discussed in making a silhouette effect. We end up coming back home 12 hours later.... What a long location scouting day!

Then on a separate day we had the green screen studio to test stuff out.

This is a vlog that combined the location scouting in Farnham and the studio test.


We really like the green screen result and we are sticking with that! I allowed us to have more creativity on the background locations in terms of constructing the landscape and also constructing the meaning.

In this week, we are going to do a storyboard together and put up advertisement to look for a dancer.

Friday, 17 February 2017

Post-production of Studio Shoot and Reflections(Camera Operator/ Editor)

I started with changing the file names according to their scenes and shots 
It's been so long since the studio shoot. When I first imported the clips into Avid, I was so confused about the names. So the first thing I did is to rename all the clips into scene-shot-takes. One thing I noticed what I had done wrong on set is that I started recording before the clapperboard was in place. I was thinking: I must not miss a thing. That means I have to skip a little bit in every clip to find the clapperboard for the information I need. I guess in the future if I am operating camera on set I will only roll when the clapperboard is in place and focused.

Finished. I call this satisfaction. 
After renaming and rearranging them according to names, I feel very satisfied. Also, all the memories of studio shoot came back to me at once. I remember shooting most of the normal light shoots on the first day, coloured shoots on the second day. I remember what scene is about which part of the "narrative" as I put them into 5 scenes when making the shot list. I remember the extra 6th scene was added on set to have shoulder rig shots of the whole "dance", in every different lighting.  I remember my shoulder and arms were exhausted filming intensively the shoulder rig shots. I remember each shot and what camera movements were taken with which equipment used. I remember that a day before the shoot we had to completely change the shot list as we found out the actors are doing movements that are not expected by the camera team. I remember now, I was a proud Camera Operator. It might be an advantage for me editing this, or a disadvantage. It being an advantage because I can edit fast according to the planed scene and shots. It might be a disadvantage because I know which shoot we put the most effort in and I might prefer those than the ones that are more suitable. So I have been keeping that in mind and remind myself: I am an editor, do my job. 


Then I labeled the colours of each shot. (picture taken after doing 3 edits)


I started by doing a rough cut of just picking best shots. Then I started the "rough cut 2" in the aim of picking best shots to add into the edit. I also started thinking about which lighting I want, blue, red or normal. The third cut is more about effects. While playing around with effects, I suddenly question myself: Do I need effects? What do these effects add to the edit and how do they help with the story telling. I had fun but at the end, I decided to get rid of almost all the effects but one. That one effect added is FluidBlur, in the part where the actors decided to interact/ hug each other. It is a state where they are trying to get to know/ feel each other. It is also uncertainty that they are figuring out what to do with each other/ Superego doesn't know what to do with her "reflection". The blur added towards the feeling of uncertainty. Also, cutting between the two lightings, red and blue, help illustrate their feeling of a decision making. 

My goal in this edit is to make audience watching it without noticing the edits. Well I guess that's the basic, being seamless. I am not sure if I succeed because I have watch the edit for so many times. I would say I definitely improved my skills since the last time I used this programme for my Maps & Network project.


At the end of the editing sessions, I started doing the title and credits. My first idea for title was to have "Entity" appear on one side, then have another "Entity" to come out from the original one going towards the other side. It doesn't look good and there is not necessarily an "original" between Id and Superego.  


Then I thought about the lightings in the film. I made a few version of titles playing with the colours but it all seems not right. The red and blue just made it look like 90s or 80s show. The font doesn't work as well. I chose it thinking the crack of the font just like the crack in the reality of Superego's (i.e. the "mirror"). 

I decided to just go with the basic. Normal font, white and still. There is no need for a distraction to the film. 

As for the credits. I decided to go with the rolling credits. The duration of that would be shorter than having stills showing the names. I really like the fact that it gives a feeling of an episode of a mini series. 

Timeline with sound edited. 
This sequence is called "Rough cut 3 Effects. Copy01", lol. I duplicated the final editor that I decided to go with and started doing colour correction in this sequence. I totally forgot to rename it. 

I only did some simple colour correcting to the clips with normal lightings and kept everything in the red and blue lightings. 

I made some sounds with my MIDI keyboard so that I can edit them according to the pacing of the visual edits.


Overall, I hope I did well.

Thursday, 9 February 2017

How to Create the Silhouette Effect in Video?

Having the silhouette scenes in the dance video will be a big challenge.


If it is in the form of photography, it would look like that in the photo. However, it will not be that perfect when filming as the light will change whenever the camera or the dancer moves. The only possible way of doing it might be using the technique of rotoscoping to fix it frame by frame in AfterEffects. For a picture, most likely people are doing finishing touches in Photoshop, making perfect silhouette. 

We tried looking up ways to film a silhouette video. 


This is nice but has to be done in a studio.


 Again, in a studio. Black and white.


 This was really cool when I watched it 3 years ago. They are performing behind a projected screen, making use of their bodies to create locations.

All of these are not really what we wanted as they are quite flat images. So maybe filming on location is not we are looking for in creating the style.

How about, instead of filming the dancer on location, we film in a green screen studio? After consulting Phil, we decided to look into making compositions out of photographs. We recalled the video that he showed us when learning AfterEffects in year one about parallax effect. It actually looks pretty decent in creating moving images. Also, we were looking at Limbo the indie game for its interesting quality. We figured just put more layers in the image to create a sense of space. Phil suggested us to take multiple pictures of the location, play with the ISOs other settings. We can animate the objects by layering different photos with different settings together as well. 

We are going on location scouting on Monday and a studio test with green screen on Wednesday. Will definitely play around with the photos taken and the footages with green screen to see if the technique works. 

Wish me luck. 

Dance Video Pre-production - Concept

The Outline

The dance video will follow a dancer's Journey in practising the dance in a studio. Through practising, some sounds would trigger the dancer into an emotion and the dancer will be brought into a location from the past. While in locations, the dancer will be in a silhouette form, so as the objects in scene. Ideally, the dancer is doing ballet so that the movement can clearly be seen in the form of silhouette. After going into different emotions and locations, or even coming in and out of the locations and the studio, the dancer completes the dance in the studio, hence the video ends. 


Possible look that we want for the silhouette part. 


Thinking about the smooth transition between locations. This might be a set built and they are working in a studio. It's interesting how they put them together in edit.


Change of light is very interesting as well. The potential of completely changing the mood of the dance is inspiring. I wonder if they did that on set or in post. Doing that on set can be good as well. In a practise shoot in Mirella's Grad Film Unmerciful, we did the light changing from blue to red on red. That worked really well.


There are a lot of things that we need to consider:

1. Locations and what they mean
2. Post-production - how would it work to create the style in post-production
3. Dancer - choreographing, going to locations
4. Camera movements
5. Fundraising?
6. etc.

Plans

We are going to location scouting soon and try to film them. That way we can test out the footage and see if we can achieve the look in post-production. Once we confirm it will work, or if we found a way to work around it if it doesn't, we will start storyboarding. Also, we will look for a dancer soon after getting the locations down. There are surely a lot to do and I am a bit nervous about it. I believe once we get it started, it will surely flow naturally, I hope.


Wednesday, 1 February 2017

Dance Video Research

TV vs Film

Music driven vs Dance driven


TV industry is a very competitive entertainment industry. Every episode has to appeal to the general public and "to entertain" is the aim. Glee was a very popular TV series based around a group of school students' singing career.

Dance: Music driven, tends to be repetitive along with the lyrics

Camera: focus on faces, as they are the selling point

Editing: flows with music

*In words: samey, poppy


"PINA is a feature-length dance film in 3D with the ensemble of the Tanztheater Wuppertal Pina Bausch, featuring the unique and inspiring art of the great German choreographer, who died in the summer of 2009.
PINA is a film for Pina Bausch by Wim Wenders.
He takes the audience on a sensual, visually stunning journey of discovery into a new dimension: straight onto the stage with the legendary Tanztheater Wuppertal Pina Bausch ensemble, he follows the dancers out of the theatre into the city and the surrounding areas of Wuppertal - the place, which for 35 years was the home and centre for Pina Bausch's creativity."


Dance: choreographed

Camera: focus on movements

Editing: flows with the movements

*In words: immersive, poetic


"Wenders felt that he had not yet found a way to adequately translate Pina Bausch's unique art of movement, gesture, speech and music into film."

"With 3D our project would be possible! Only in this way, by incorporating the dimension of space, I could dare (and not just presumingly), to bring Pina's Tanztheater in in an adequate form to the screen. "

"After half a year of intensive work, and only two days before the planned 3D rehearsal shoot, the unimaginable happened: Pina Bausch died on June 30th 2009, suddenly and unexpectedly."

"Wim Wenders used Pina Bausch's own method of "questioning" with which the choreographer developed her new productions. She posed questions and her dancers answered not in words, but with improvised dance and body language."


The major difference between the two works: the music driven one has no meaning in it, the dance film provokes thinking. In relaxing hours, music driven works are very appealing as seen how popular Glee was. The dance film was absolutely amazing even though I didn't watch it in 3D. The storytelling was great and the film was immersive.


Monday, 23 January 2017

Map & Networks Final Words

Reflecting from my own words

Learning Agreement:

Sound Design:​ 
I already know how to record sounds (with the Zoom or in theSound Booth) and basic editing of sounds in Pro Tools. I would like go more in depth with Pro Tools. Also, I haven’t use Pro Tools to edit instruments yet so I want to learn more about it. I will get help from James if needed.
I spent ages trying to figure out the soundtrack but lost all my files as hard drive died. Re-did my soundtrack after finishing all the edits before Christmas holiday. Ableton were used to create sounds and Audition were used to edit. I did not use Pro Tools because I want to edit the sounds at night, next to my MIDI keyboard. Didn't really feel like editing in a shared room. Audition was well capable of what I was trying to achieve. 


DOP:​ 
I already know how to use the GH4 and setting up lights. I want to learn more by using GH4 in the studio shoot and designing lighting to achieve good cinematic look. I will get Chris to help with the studio shoot as I need the smoke machine.
Mission accomplished, I am very happy with the outcome. I am very confident using the GH4, quite confident in lighting. Really appreciate Chris's help during the shoot. Hope he is not annoyed at me because I basically talked to him many times before filming to confirm about if stuffs are still okay. Phil helped me a bit before the shoot as well. I was panicking about the shoot, afraid of anything went wrong. Phil told me to prepare everything and make sure everything is prepared. He also suggested that I can do some practice shots to test if all the shots are good. It was a grate tip and boosted my confident when I made sure that I had everything prepared. 

VFX:
 I learn how to green screen from last year and I will still make use of After Effects for it.
Not happy about the frame being cut off due to the huge set in G12...

Editing:
We just started learning Avid. I want to practice on using Avid by editing the film with it. I will get help from Victoria if needed.
I am really happy about the practise! Victoria helped a lot and I learnt a lot during the editing month.


HK is a mess right now. Sometimes it is quite depressing to see my film. I feel like HK is in the exact situation, trapped in the loop of political smog. 

Sunday, 15 January 2017

Setting up the Exhibition


It was a weird experience coming back to university after a nice Christmas holiday. Maybe it is just me. My flight from Hong Kong got cancelled due to a snowstorm in Europe so I had to book an expensive direct flight back to UK. I took this 13-hour flight departed at 1:30am on 9th January (HKT) and arrived London at 6:30am on 9th January(GMT). From Heathrow Airport, it took me almost 2 hours to come back into Farnham due to the heavy traffic caused by the Tube strike. Then I went straight to university and managed to arrive just before 10. What a journey. 

I consider myself very lucky to arrive in time to attend the class. It was quite important as to know what is going on for this all-important exhibition. Sadly I couldn't help curating the exhibition but Billie and Sugini did a great job. All we need to do is to set things up.  


Tom the technician brought us everything and helped everyone setting up. Although it was a long wait as Tom is helping at least 15 of us, it is appreciated. 


I am very grateful for the spot I have for my piece. I requested a dark area for my screen because of the low-light elements in my film. Turns out there is a screen already there in the darkest part of the corridor. It looks so good in the spot and I am very happy that it is facing the International Foundation corridor and people recognised it is my piece. 

I am excited to see all the works being shown to the public. 

Thursday, 15 December 2016

Reflection on being a Camera Operator


Visualising the shots were not easy for us due to the film being an abstract piece. Diagrams helped. We discussed every single shot all over again after seeing the rehearsal clip. We had half a day left to redo the shot list and we were quite stressed. 

The next day, we arrived very early and made sure the equipment are fine, the batteries are charged. The sent up time went longer than expected because it was the dolly. It was kind of expected that dolly shots take the longest time to set up though. The actors took longer time than expected to warm up as well so everything was fine. The filming process flowed after the first few shots. The only problems that occurs were when we start to set up a different equipment. It was kind of expected for the first time as well, so not very much of a problem. The shoulder rig was a tricky one. We had to tape the camera very firmly with the should rig to make sure it's steady. The set up was very heavy that I need take constant breaks in between the takes. 


We were referring to the shot list on set
This is to remind us the movement of the camera as the schedule won't provide it.
Made notes on schedule
Sugini were helping to make notes onto the schedule. It is important for us to note the settings on camera for each shot or changes that's made. It became useful when we need to re shoot the shots.
Made notes on schedule
Some shots needed re take because the external monitor Ninja Blade corrupted the footage. We called Dave for help and later discovered that we should give the Blade some breaks between shots to prevent over heating it. The over heating might be a problem that caused the corrupted file. Also, the wire need to be taped down and not given a chance to be moved.

We improved a lot on the 2nd shoot day that we are either on schedule or ahead of schedule. It made a less intense mood on set than the 1st day because we know what we are doing now. It also helped when we had pizza for lunch! I imagine it must be funny for people to see 5 of us, each holding pizza boxes and walk in a line, all the way back to the university. The day was cold but pizza kept us warm.

I think we all did well in the shoot. As a camera person I don't have much to comment on other departments on set. I was very much concentrated on trying to shoot the shots right. I was in the zone the whole time. Thinking about the next shot > setting up equipment > thinking about the shot > making effort to do the right shots > rethinking the take > thinking about what to improve and what to keep for the next take > was the props at the place > making effort to do a better take ....... It goes on and on and on that the shoot days went so fast, in my perspective. I really appreciate the fact that Ethan, Sugini and I work well together. I sincerely felt the power of teamwork when we wrapped. I am also proud of myself being a camera woman.

Saturday, 3 December 2016

Post Production of Map & Networks Project (3)

shorten the fade in/out animation
The last edit was pretty good but need some minor adjustments.

The first one is to make the text stay longer on screen. I just need to move the keyframes.

The second adjustment is to make the green screen part match the rest of the film in terms of colour and flow. The one thing I didn't try is the saturation and Sugini reminded me that. So this time I tweak the saturation before tuning the colours. It worked out so well and the skin tone is no longer too obviously red. As for the flow, I make individual images come in and out instead of of come in and out as group. The flow is much better now.

As for the music, I am very sorry for Jay that I lost the guitar recordings as my hard drive died. I now have a different feeling towards the topic and might need to approach the music differently.


Sunday, 27 November 2016

Post Production of Map & Networks Project (2)


This is a second major update for the edit and a few things has changed to make the film in a better flow.

First, the green screen part. I have been trying to fix the skin tone but it was still to red. So I try to think of another way to make the skin tone not so noticeable by creating fast cuts of images. So instead of staying longer on screen the images come in and out of screen fast. 
getting fast cuts


Getting fast cuts
The result didn't turn out great. It looks way too tacky because the images are flashing. It ruins the whole film. I decide to stick to the original edit for the green screen part. 

The second major change is the positioning of the news headlines. Instead of having them all on the face mask one after another, I put them in between the shots through out the whole film. The original plan was to project the images of the news headlines on the face mask on the shot day but it flickers when shown on camera. So I might as well split them up to be shown in between shots to slowly feed the news facts to the viewers. It turns out well and sets the style the of film.

The third major change is the transitions. I added some "dip to colour white" to create a flash visual effect. I layered some images in the beginning part of the film to give hint to the audience the theme of the film. It also allowed me to cut some footage shorter by placing the visual effect. 

Overall, the pacing and style is much better now. I am hoping I can get some sound done before the next tutorial. 

Fingers crossed. 


Tuesday, 22 November 2016

New Progress on Studio Shoot! Walls :)

I am proud of myself today. 

Katherine brought us stuff again. Thank you!

Sugini and her dust sheet

We start with base coat grey

Accomplished this in 15 mins, with 6 people

Second stage of paint, took ages.....
So by the end of the day we covered two sides of the wall with the paint pattern you see above. It was taking ages and requires three teams of two people to do the full wall. In the team, one with brown brush one with grey. The brown goes first and then the grey, both using the dabbing technique. The aim is to blend the two colours together to give a rusty effect. I didn't take a picture of the final product but it looked great! It certainly gives a 3D texture that will look great on camera. Tomorrow we are gonna do the last stage of paint and I think it will add up on the wall and make it much better!

I am proud of myself and my team mates today. Hope everything goes well tomorrow. Please.

Also, we booked out the equipments for the pre-light day and the shooting days. Yay! I learn one thing from Julie that the Slider doesn't come with the Tripods. Thanks Julie haha I would have forgot to put more tripods on the list.

Saturday, 19 November 2016

Camera Movements and Gripping Workshop

Moviola Crab Dolly
The Dolly is a fun equipment to use. Well I have just been sitting on it not pushing it... Thank you Chloe for taking up the Gripping role... In the hope that I am not too heavy, I concentrated on the camera movement. We tried out two shots that was in the shot list to see how well it will work.

The first one we tired was a pan from one room to the other. Billie volunteered to be the actor standing in the SuperEgo room and we used the Dolly to move across the room. Sugini and I were on the Dolly, with Chloe pushing it and Ethan overseeing the scene. The idea is to reveal both rooms with a wide smooth pan. We tried moving the Dolly in a crab way but it wouldn't stay straight because Chloe was pushing the Dolly at on end. Chris the Studio technician suggest that we just push the Dolly normally but with the camera pointing to the side. In that way, the Dolly stays straight. So we tried it a few times with different distance to the middle wall. We agreed on staying as close to the middle wall as possible to give a smooth transition from one room to another. That is actually what we want originally but instead of using the slider, Dolly is a better choice in terms of range and flexibility.

The second one is when the SuperEgo walks into the room. Billie asked Logan to be the actor, so that we can have her to operate the hydraulic pump to do the jib up. This one is harder to achieve because the timing has to be right between the Billie and Chloe. The idea is to jib up from the actor's shoes to the hand, which the actor is holding his phone, while tacking the actor walking into the room. With the aid of making how far the jib up will go on the Dolly, we tried a few time and succeed. However, Logan decided to have the actor holding the phone up instead of down by the side. This time we need Sugini to pan the camera up a little bit at the same time. I couldn't do it because the camera is pointing at a side that the handle wasn't accessible for me but for Sugini. We tried a few times and it looked okay. Again, this is a shot that was assign to use the slider but Dolly is a better choice in terms of range and flexibility.


Left : Glide Cam      Right : Slider
The slider actually surprised me. When I was on set for My Daughter's shoot, they didn't use the motor for the slider. So when David told us that there are actually a slow and fast motor for it I was surprised. I asked if it is better to use the motor or by hand he said it depends if you have steady hands or not. I guess I will think about that.

The last one he introduced is the Glide Cam. It took so long to set up because the balance has to right for it to be steady. The Glide Cam itself is too heavy for me to hold but it was better if I have the vast on. Billie took a picture of me holding the Glide Cam, wearing a vast. The gear looked cool but my face shows that I was dead inside haha. I asked for the picture thinking to put it on here but nah... Billie can have it on her blog xD. The vast was too big for me that there was gap between my shoulder and the vast. It made me easily crushed because it wasn't distributing weight to my whole body but somehow distributing it to my lower part of the upper body. I felt my back within a few minute and didn't manage to climb the stairs. I think only Artus managed to climb the stairs? Ethan can wear it fine but he doesn't think that we need this for our shoot.

As for shoulder rig that Anne showed us, it is good for the fight scene and after if I want some curve lined camera movement. We might try out the EX3 on that shoulder rig and Ethan's shoulder rig on rehearsal to see which one is better.

In conclusion, we loved the Dolly and think that there are more opportunity for us to use it to achieve better shots. The slider will be used for tighter spaces, for example the shot that's going in and out of the mirror. We prefer not to use the Glide Cam and motor for the Slider because it is time consuming to set them up. Also, they are not necessary. All we need right now is to have more time to practice on the equipment. So we asked for the equipment on rehearsal day and hope we can get it.

Fingers crossed!